Tuesday, May 17, 2011

DIY- 5 Easy Steps to transform a boring white T-shirt


DIY-  5 Easy Steps to transform a boring white T-shirt
into a fun and trendy scarf


Do you have any extra shirts lying around the house? You know, those shirts that have a food stain somewhere on the front (or in my case red wine)?? Well, I saw this awesome video from the ladies over at TheDIYDish and I immediately ran to my closet to see what I should take my Fiskars to! 


MATERIALS:

  1. Old T-shirt (Any color you choose)
  2. Pair of scissors
  3. Paper plate
  4. Any embellishments you fill fit


STEP 1:  You will want to use the paper plate as your template, cut around the paper plate (I was able to get 8 circles with a large white T-Shirt)


STEP 2:  Once you have your circles cut out, you will need to cut each circle into a spiral shape (I've drawn on one of the circles for reference)


 Your circles will now look like this :)


 STEP 3:  Once your spiral "strips are cut, you will want to grab each end of the strip and give it a few firms tugs, this is to stretch the material slightly (which will cause the T-shirt to curl on it's ends)


STEP 4: Once you have stretched out all of your T-Shirt strips, you will want to lay them all on top of each other ( As you can see by the red arrow, I used an extra piece of material to tie the strips together)


STEP 5:  Add any embellishment that you want (or none at all) this is where you let your creativity run wild!! I personally used left over flowers from a project that the wonderful Heidi Borchers and Tiffany Windsor displayed in our booth at the Craft and Hobby Association show. feel free to add something that shows off your style!!


And here ya go!!! Isn't she a beauty?? LOVE LOVE LOVE


Looking forward to Helping you create projects that are to DIY for!!

Tar'Lese

Monday, May 9, 2011

I heart Inspirational Quotes


For those of you that know me, know that I am pretty much OBSESSED with motivational quotes.  A few weeks ago during our monthly marketing meeting our Chief Creative Officer had a great idea... She suggested that each come up with a quote that means something to us and bring it to life. Once we were finished, we each hung them up around the office to set a fun and positive vibe as we walk in and around the building each day. 


This is the one I made for my area


We also had the option of making one for people that were absent from work that day.  I made this one for my coworker Holly


And this one for my Coworker Mark


What are you filling YOUR creative space with?? Make sure it's something POSITIVE and FUN!!


Looking forward to Helping you create projects that are to DIY for!!

Tar'Lese

Friday, May 6, 2011

DIY Glitter Flats


I was looking on Zappos.com over the weekend and came across THESE !
OK, how cute are those!! But $60.00??.... I immediately thought
 I CAN TOTALLY MAKE THOSE! 


I headed to Target and found these for $6.98!!!


OK, I know that you are probably thinking
 "Tar'Lese, those look NOTHING like the Steve Madden flats"  

Trust me.... there is a method to my madness :)


First step was to tape she bottom part because I wanted to paint the flats black and wanted to keep a clean line


After taping off the part that I didn't want painted, I grabbed my
Tulip Soft Fabric Paint and a foam brush and applied one coat of paint


After the flats dried, I grabbed my Crafty Chica black glitter and Tulip Glitter Bond.... this is where the FUN begins!! With a cosmetic sponge I applied a thin layer of the Tulip Glitter Bond and then went to town with the Crafty Chica glitter (I laid a piece of scrapbook paper under the shoes to catch all of the excess glitter so I'd be able to pour it back into the bottle)


After the Tulip Glitter Bond dried I decided that I wanted to jazz them up a little bit.  I found a couple rhinestone rings in the dollar section at a local boutique so I decided to cut the ring part off and glue them on the front of my shoes.  I used Aleene's 7800 glue to adhere them


HOW CUTE ARE THESE!! love love love!! and they only cost me $7.00 instead of $60 since I already had the paint and glue! All of the girls at work asked if I made them for the Royal Wedding since it was the same day :)


Looking forward to Helping you create projects that are to DIY for!!

Tar'Lese


Thursday, May 5, 2011

Cinco De Mayo Shrimp Salsa Recipe


Happy Cinco De Mayo friends!! 
I figured that today would be the perfect day to share a yummy and healthy shrimp salsa recipe with you!


Ingredients:

  • 1 Large red onion chopped
  • 1 bunch of green onions chopped
  • 4-5 Large Tomatoes (depending on size) chopped with seeds removed
  • Jalapenos finely diced (amount will depend on how spicy you like it)
  • 1/8 cup fresh chopped cilantro
  • 2 large avocados chopped
  • 1 lb. cooked shrimp cut into quarters
  • 1 lb. fresh crab legs shredded into bite size pieces
  • 2 fresh limes
  • Salt and pepper to taste

In a medium bowl, stir together all diced ingredients. cut limes in half and squeeze juice onto the mixture and stir again. Add salt and pepper to taste. *Chill for one hour in the refrigerator to allow flavors to mix together before serving.


Looking forward to Helping you create more projects that are to DIY for!!

Tar'Lese

I love Creative Quotes

Wednesday, May 4, 2011

HelpMeCreateIt.com goes from a dream to a reality


About a month and a half ago I was on a plane to Fresno from Seattle, I had just finished 7 days in beautiful Washington for the National Art Educators Association Convention and was EXHAUSTED!! I am not the type to ever fall asleep during a flight so my mind was racing.  I cranked up some Bob Marley on my IPhone and decided to jot a few things down in my journal.  I started writing down different goals that I wanted to set for myself and things I had always wanted to do but never had the time to do  but was to lazy to start :)

One of the goals was to start a craft blog.  You see, I am a crafter to the core, ( I have over 200 craft blogs bookmarked on my phone... I am kind of obsessed)  it's what makes me HAPPY.

I began to doodle and had a cool idea for a logo
(Please stop laughing at the fact that I can't draw)


The next day at work I talked to my friend Alexa A.K.A Swell Designer
(check out her amazing blog) and showed her what I had some up with.  She said, "Let me see what I can do for you".  That evening I received an email with my AMAZING logo!! I LOVED it!

It's SO great to see your ideas come to life.... it warms my heart!! I am slowly crossing other things off of my "Goal list" and can't wait to share with all of you!! IF YOU have something that you have been putting off, all you have to do is take the 1st step! You never know unless you try. 

Dreams DO come true!!


Looking forward to Helping you create projects that are to DIY for!

Tar'Lese


Michael's Friends and Family Coupon Printable


Woo Hoo!! Working for iLTC Rocks!! Michael's just sent us a "friends and family" coupon for 20% off purchase (including sale items) (Click Here) to Print your own!

Looking forward to helping you create projects that are to DIY for!!

Tar'Lese

Somewhere Over The Rainbow Printable Quote by Swell Designer


How cool is this Printable by Swell Designer?  You can get it here !! Her blog ROCKS, she always creates the CUTEST colorful projects!!


Looking forward to Helping you create projects that are to DIY for!!

Tar'Lese

Tuesday, May 3, 2011

DIY Monogram Wall Decor


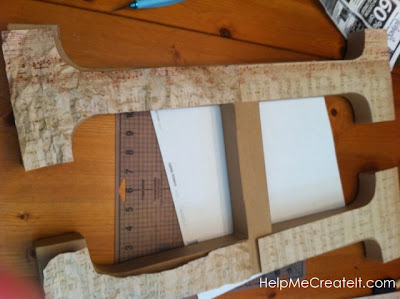
Monogram ANYTHING seems to be all the rage lately so when I was at Joann's one day looking for fabric and saw THIS a large cardboard H for 50% off, I had to grab it!!
(Wasn't sure what I was going to use it for but for $7.00 I couldn't pass it up!)


I decided to grab my Collage Pauge and scrapbook paper and go to work!


I layed the H ontop of the scrapbook paper and cut out several pieces. 


I used my Collage Pauge to glue the scrapbook paper on and once it dried, I used my Tim Holtz Distress ink and rubbed it along the edges


It still looked a little boring :( so I had an idea!! 

I cut several small strips of scrapbook paper and burned the edges to add to the "distressed" look. After using my Collage Pauge once again and it created this really cool effect... LOVE IT!


Now all I needed to do was hang it on the wall :)


What do you think? I hope you love it as much as I do!!


I look forward to Helping you create projects that are to DIY for!!

Tar'Lese

Yo Gabba Gabba Party


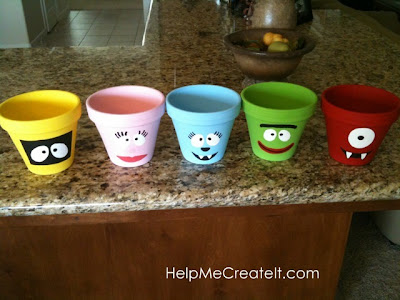
My best friends daughter was turning 2 and all she could think about was having a Yo Gabba Gabba party... I don't have children however, I have noticed that kids go NUTS for that show.  When my best friend mentioned that she wanted to set up a candy table, I had the PERFECT idea!! These were SO much fun to make!! and the kids LOVED them.


First I went to Michaels and picked up 5 Terra Cotta pots
(they were less than $1.00 each)


Then I spray painted them with white matte spray paint to give a good base
(it took 2 coats)


I used Acrylic paint for each
 (this step took a little while because I had to give them 3 coats each)


Ahhh, that's better :)


And now the FUN PART!
I hand painted the faces on each
 (I cheated a little bit and sketched with a pencil 1st)


They were a HUGE hit at the party!! 


Looking forward to Helping you create projects that are to DIY for!!

Tar'Lese

CHA Winter 2011 Show and the birth of HelpMeCreateIt.com


People ask me daily, "What exactly IS your job" so I figured I would start my very 1st blog post by explaining how HelpMeCreateIt.com was born. 

 In November I accepted the position as Trade and Consumer Events Coordinator for iLoveToCreate. Pretty much.... my job ROCKS!! I get to travel the globe and craft all at the same time!! Yippeee! My very 1st show was the Craft and Hobby Association show in Los Angeles.  Our booth was one of the largest at the entire show!! (2,200 square feet!!)


It was SO neat to plan this Tradeshow, we had almost 50 employees there, not to mention thousands of products.  The coolest part was that we had several "celebrity designers" doing Make it Take its!


After having a conversation with the wonderful  Alisa Burke about her amazing blog, I decided that I wanted to start a craft blog too!! (Mind you this was in January and my 1st post is in MAY... whoops!)

I am SO excited to share all of my fun and quirky craft projects with you and show you just how easy it is to create beautiful things regardless of budget!

I look forward to helping you create projects that are to DIY for!!

Tar'Lese